- 1 MongoDB数据库概述及其环境搭建
- 3.MongoDB增删改查操作
- 案例事件(增删改查)
- 总结
1 MongoDB数据库概述及其环境搭建
1.1 为什么要使用数据库
- 动态网站中的数据都是存储在数据库中
- 数据库可以用来持久存储客户端通过表单收集的用户信息
- 数据库软件本身可以对数据高效的管理
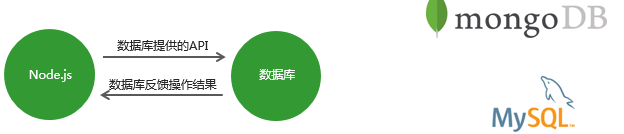
1.2 什么是数据库
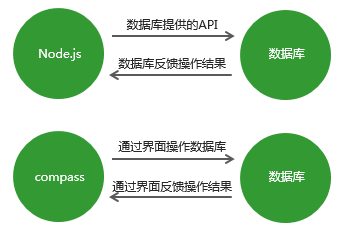
- 数据库即数据存储的仓库,可以对下数据进行有序的分门类的存储,是独立于语言之外的软件,可以通过API去操作他
- 常见的数据库有:mysql,MongoDB,oracle
- 选择MongoDB的原因是:它可以使用js语言操作
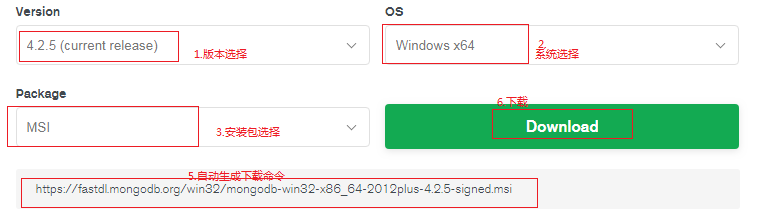
1.3 MongoDB下载
- 软件下载
- 可视化工具下载tools
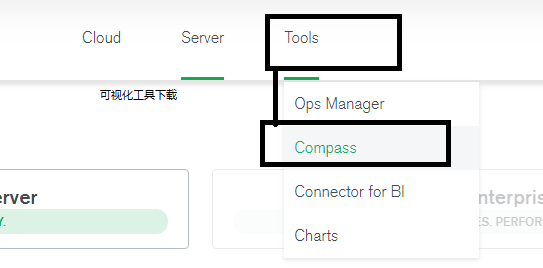
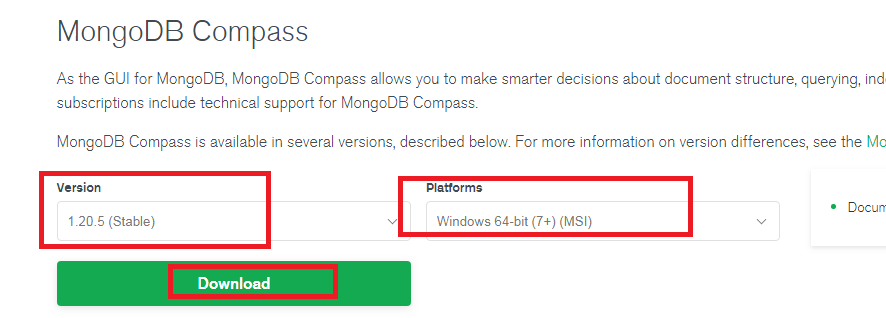
1.4 可视化软件
- MongoDB可视化操作软件,是使用图形界面操作数据库的一种方式。
1.5 数据库相关概念
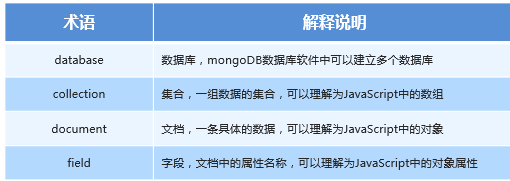
- 在一个数据库软件中可以包含多个数据仓库,在每个数据仓库中可以包含多个数据集合,每个数据集合中可以包含多条文档(具体的数据)。
1.6 Mongoose第三方包(插件)
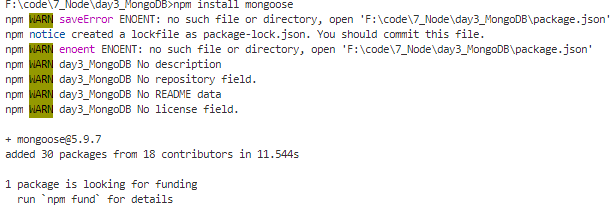
- 使用nodejs连接数据库需要使用第三方包Mongoose
- 下载命令
1
npm install mongoose
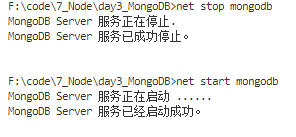
1.7 启动和关闭MongoDB
- 启动
1
net start mongodb
- 关闭
1
net stop mongodb
1.8 数据库的连接
- 使用MongoDB提供的connnect()方法连接数据库
- connect(‘mongodb:域名/数据库名称’,{参数})
- 参数1:monggodb代表解析协议,
- 参数2:为对象,用于接收参数{}
- 返回值是一个promise对象,所以可以直接通过then(),catch()等方法来接收连接成功与否的信息
1
2
3
4
5
6
7
8
9
10
//获取第三方模块
const mongoose = require('mongoose');
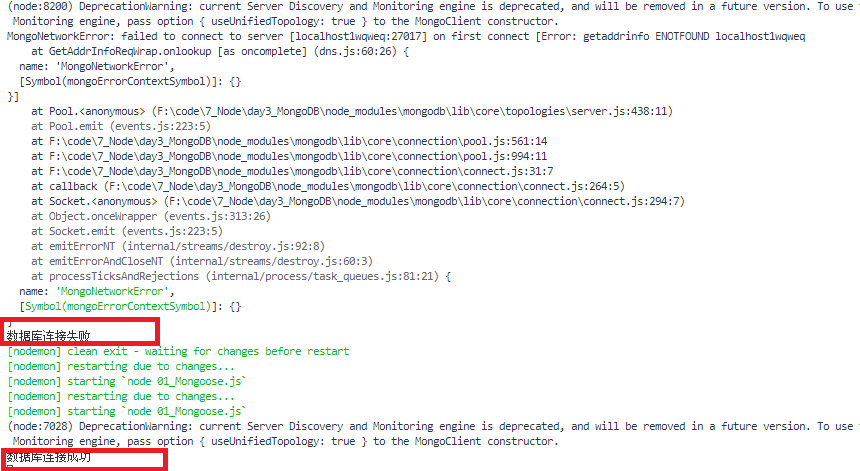
mongoose.connect('mongodb://localhost/playground', { useNewUrlParser: true })
.then(() => {
console.log("数据库连接成功")
})
.catch((err) => {
console.log(err);
console.log("数据库连接失败");
})
- 执行结果
1.9 创建数据库
- 在MongoDB中不需要显式创建数据库,如果正在使用的数据库不存在,MongoDB会自动创建。
3.MongoDB增删改查操作
3.1 创建集合(collection)
- 创建集合分为两步:
- 对集合设定规则
- 创建集合
- 创建mongoose.Schema构造函数的实例即可创建集合。
1
2
3
4
5
const courseScheme = new mongoose.Schema({
name: String,
author: String,
isPublish: Boolean
}, { useUnifiedTopology: true }); - 通过mongose的model()方法创建规则
- 参数1:集合名称,必须要大写
- 参数2:集合规则(Schema构造函数的实例对象)
- 返回值是一个构造函数通过大写的变量接收,用于创实例对象,添加集合数据
- 代码如下
1
2
3
4
5
6
7
8
9
10
11
12
13
14
15
16
17
18
19
20
21
22
23
24
25
26
27
28
29
30
31
32
33//获取第三方模块
const mongoose = require('mongoose');
mongoose.connect('mongodb://localhost/playground', { useNewUrlParser: true })
.then(() => {
console.log("数据库连接成功")
})
.catch((err) => {
console.log(err);
console.log("数据库连接失败");
})
// 创建集合规则
const courseScheme = new mongoose.Schema({
  name: String,
  author: String,
  isPublish: Boolean
}, { useUnifiedTopology: true }); //通过mongoose的schema()构造函数创建集合规则
/*
通过mongose的model()方法创建规则
- 参数1:集合名称,必须要大写
- 参数2:集合规则(Schema构造函数的实例对象)
- 返回值是一个构造函数通过大写的变量接收,用于创实例对象,添加集合数据
*/
const Course = mongoose.model('Course', courseScheme);//数据库中显示courses
// 创建实例对象
const course = new Course({
name: "javascript",
author: 'lili',
isPublish: true
})
// 保存实例对象
course.save(); - 执行结果在可视化界面(node xx.js运行代码)
- 注意id是数据库默认添加的文档唯一的标识

3.2 创建文档
- 向集合中插入数据
3.2.1 方式1:通过new 构造函数的方式创建
- 分为两步
- 通过构造函数.create()创建
- create({})
- 参数1:新创建的对象
- 参数2:回调函数(异步API)**
- 返回值是promise对象**实例
- 这里的create()是异步API,执行方式有两种
- 回调函数
- promise方式
1
2
3
4
5
6
7
8
9
10
11
12
13// 异步API执行方式1:回调函数
Course.create({ name: 'JavaScript', author: 'lili', isPublish: true }, (err, result) => {
console.log(err);
console.log(result);
})
// 异步API执行方式2:promise
Course.create({ name: 'JavaScript', author: 'lili', isPublish: true })
.then(result => {
console.log(result);
})
.catch(err => {
console.log(err);
})3.3 MongoDB数据库中导入数据
- 需要先在系统环境中配置变量
1
2D:\MongoDB\Server\4.1\bin;
添加在系统变量中 - 重启cmd
- 输入导入语句
1
mongoimport –d 数据库名称 –c 集合名称 –file 要导入的数据文件
执行结果显示:1
mongoimport -d playground -c users --file ./user.json

可视化界面中插入的情况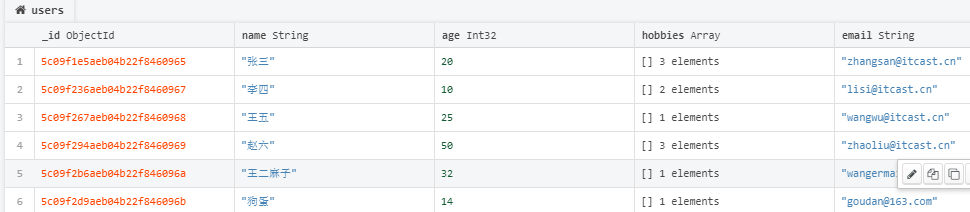
3.4 查询文档
- 获取集合对象
1
2
3
4
5
6
7
8
9
10
11
12
13
14
15
16
17
18
19
20//1.获取第三方模块
const mongoose = require('mongoose');
mongoose.connect('mongodb://localhost/playground', { useNewUrlParser: true })
.then(() => {
console.log("数据库连接成功")
})
.catch((err) => {
console.log(err);
console.log("数据库连接失败");
})
// 创建规则
const userScheme = new mongoose.Schema({
name: String,
age: Number,
email: String,
password: String,
hobbies: [String]
});
// 使用规则创建集合
const User = mongoose.model('User', userScheme);1. collection.find()方法
- 查询数据库中文档,条件为空则查找所有文档
- 参数:{}对象的形式
- 返回值是promise对象实例
- 返回值[]数组形式
- 异步执行API
1
2
3
4
5
6
7
8无条件查询:
User.find().then(result => {
console.log(result);
});
有条件查询:参数是对象形式
User.find({ _id: '5c09f2b6aeb04b22f846096a' }).then(result => {
console.log(result);
})
- 返回结果
2. collection.findOne()
返回值是文档的形式,只返回第一个查询到的文档
- 其他与find一样
1
2
3
4
5
6User.findOne().then(result => {
console.log(result);
});
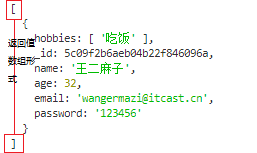
User.findOne({ name: '赵六' }).then(result => {
console.log(result);
});
- 其他与find一样
执行结果
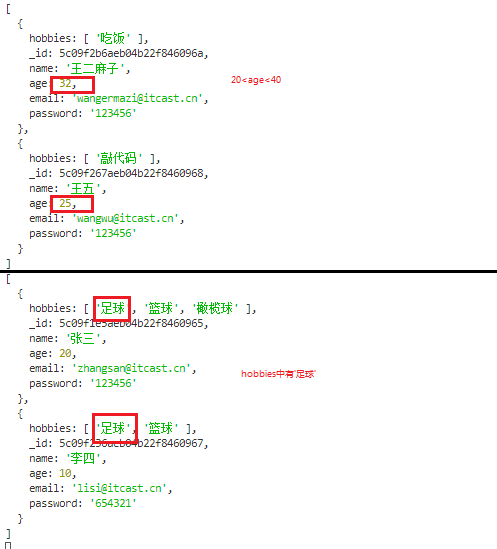
3. 条件查询$gt,$lt,$in
$gt:大于
$lt:小于
$in:包含
注意条件查询判断放在{}中eg:{ $gt: 20, $lt: 40 }
1
2
3
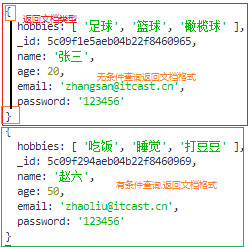
4查询用户集合中年龄字段大于20并且小于40的文档
User.find({ age: { $gt: 20, $lt: 40 } }).then(result => console.log(result))
// 选择hobby字段中包含'足球'的文档
User.find({ hobbies: { $in: '足球' } }).then(result => console.log(result))返回结果
4. select()
选择查询的字段名,并且只显示查询的字段名
参数:’字段名 字段名 字段名 ‘
- 字段名之间通过空格连接
- 不查询显示某个字段名在前面加-,eg:’-_id’
1
User.find().select('name age -_id').then(result => console.log(result));
查询结果

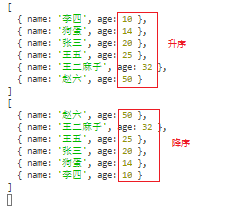
5. sort()
按照字段名进行排序
参数:’字段名’
- 升序:’age’
- 降序:’-age’(字段名前面加-)
1
2
3
4// 按照年龄进行升序排序
User.find().select('name age -_id').sort('age').then(result => console.log(result))
// 降序排序
User.find().select('name age -_id').sort('-age').then(result => console.log(result))
执行结果
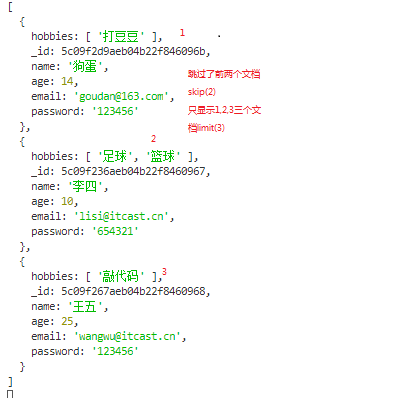
6. skip()&&limit()
- skip(num):跳过num个文档
- limit(num):显示的文档数
1
2// 查询文档跳过前两条结果 限制显示3条结果
User.find().skip(2).limit(3).then(result => console.log(result)) - 结果展示
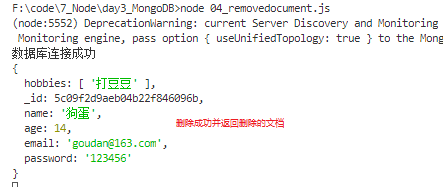
3.5 删除文档findOneAndDelete()
1.
- 删除单个文档
- 参数传递对象{name:’’}
- 返回值为删除的文档对象
1
2// 删除集合中的一个文档
User.findOneAndDelete({ name: '狗蛋' }).then(result => console.log(result))
- 执行结果
2.deleteMany()
- 删除多个文档,参数中的{}为空会删除所有内容
- 返回值是对象:{ n: 5, ok: 1, deletedCount: 5 }
- n:受影响的文档数
- ok:返回成功与否表示
- deleteCount:删除的文件数
1
2// 删除多个文档,参数不写则会删除所有文档
User.deleteMany({}).then(result => console.log(result))
- 返回值是对象:{ n: 5, ok: 1, deletedCount: 5 }
- 执行结果

3.6 修改文档
1.修改单个文档updateOne({},{})
1 | // 更新单个 |
- 修改单个文档,若有多个符合条件只会修改第一个
- 参数:
- 参数1:待修改字段
- 参数2:修改的新字段
- 返回值时对象{n: 1, nModified: 1, ok: 1}
- 修改多个文件
- 参数
- 参数1:待修改匹配文件{}
- 参数2:修改后{}
- 返回值是对象{}
- n:受影响的文件数
- nModified: 修改的文件数
- ok:操作成功与否表示,1:成功,0:失败
1
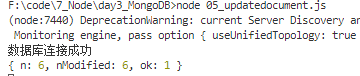
2// 修改多个文件updateMany({},{})
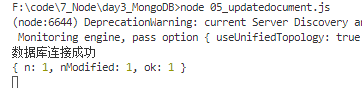
User.updateMany({}, { age: 45 }).then(result => console.log(result))
- 执行结果
3.7 mongoose验证
- 在创建集合规则时,可以设置当前字段的验证规则,验证失败就则输入插入失败。
- 设置集合字段格式:
1
2
3
4
5
6
7
8
9
10
11
12
13
14
15
16
17
18
19
20
21字段名: {}/类型/数组
{
type: String/Number等,->类型
require:[true/false,'错误信息'],->是否必传字段
minlength: [2, '错误信息'],
maxlength: [18, '错误信息'],
trim: true/false
}
**注意:**
- 字段名后面可以跟的类型
- 单个值,直接书写eg:name:String
- 多个值通过数据,eg:category:['html','css']
- 若字段名有多个属性可以写成对象eg:
title: {
value:['html','css'],
message: '输入错误信息'
}
- 字段名后面的属性的值
- 为单个时直接书写,
- 为多个通过数组[值,'错误信息'] - 常用字段名
- required: true 必传字段
- minlength:3 字符串最小长度
- maxlength: 20 字符串最大长度
- min: 2 数值最小为2
- max: 100 数值最大为100
- enum: [‘html’, ‘css’, ‘javascript’, ‘node.js’]
1
2
3
4
5
6
7category: {
type: String,
// 枚举列举当前字段可以拥有的值
enum: {
values: ['html', 'css', 'js', 'nodejs'],
message: '分类名称要在一定的范围内才可以'
}, - trim: true 去除字符串两边的空格
- validate: 自定义验证器
1
2
3
4
5
6
7
8
9
10
11
12// 自定义验证器
validate: {
validator: v => {
// 返回布尔值
// true 验证成功
// false 验证失败
// v 要验证的值
return v && v.length > 4
},
// 自定义错误信息
message: '传入的值不符合验证规则'
} - default: 默认值
- error的返回值是一个对象,对象中有errors属性,如下图
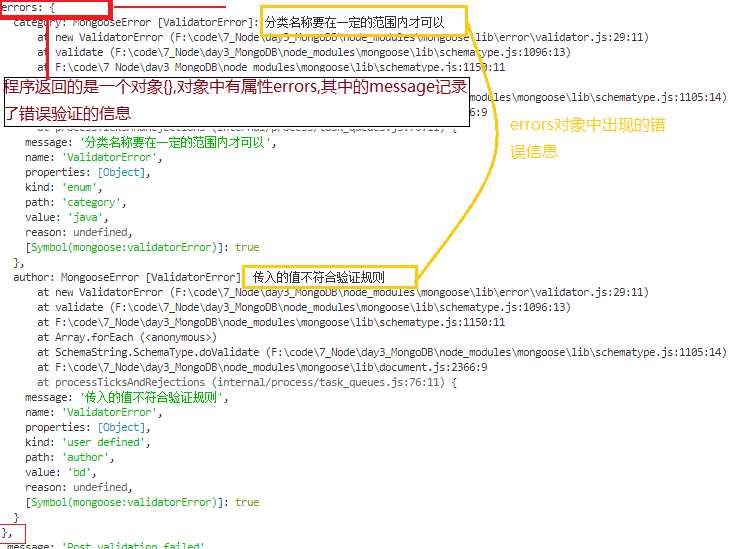
- 获取错误信息:error.errors[‘字段名称’].message
1
2
3
4
5
6
7// 获取错误信息对象
const errs = err.errors;//err的返回值中有errors对象,遍历查看错误信息
for (var attr in errs) {
// 将错误信息打印到控制台中
console.log("----");
console.log(errs[attr]['message']);
}
- 完整代码如下
1
2
3
4
5
6
7
8
9
10
11
12
13
14
15
16
17
18
19
20
21
22
23
24
25
26
27
28
29
30
31
32
33
34
35
36
37
38
39
40
41
42
43
44
45
46
47
48
49
50
51
52
53
54
55
56
57
58
59
60
61
62
63
64
65
66
67
68
69
70
71
72
73
74
75
76const mongoose = require('mongoose');
//连接数据库
mongoose.connect('mongodb://localhost/', { useNewUrlParser: true })
.then(() => {
console.log("数据库连接成功");
})
.catch((err) => {
console.log(err);
console.log("数据库连接失败")
});
// 创建集合
// 创建集合规则(Schema()构造函数)
// 主要解决mongoose验证
const postSchema = new mongoose.Schema({
// 这里传入的是字符串类型,下面的属性设置都是针对字符串的
title: {
// 类型
type: String,
// 必选字段require,后面传入数组的形式,第二个表示错误时提示的错误信息
require: [true, '请传入文章标题'],
// 字符串的最小长度
minlength: [2, '文章长度不能小于2'],
// 字符串的最大长度
maxlength: [18, '文章长度不能大于18'],
// 去除字符串的两边空格
trim: true
},
age: {
type: Number,
// 数字的最小范围
min: 2,
max: 10,
},
publishDate: {
type: Date,
// 设置默认值
default: Date.now
},
category: {
type: String,
// 枚举列举当前字段可以拥有的值
enum: {
values: ['html', 'css', 'js', 'nodejs'],
message: '分类名称要在一定的范围内才可以'
}
},
author: {
type: String,
validate: {
validator: v => {
// 返回布尔值
// true 验证成功
// false 验证失败
// v 要验证的值
return v && v.length > 4
},
// 自定义错误信息
message: '传入的值不符合验证规则'
}
}
}, { useUnifiedTopology: true });
const Post = mongoose.model('Post', postSchema);
Post.create({ title: 'aa', age: 5, category: 'java', author: 'bd' })
.then(result => console.log(result))
.catch(err => {
console.log(err);
// 获取错误信息对象
const errs = err.errors;//err的返回值中有errors对象,遍历查看错误信息
for (var attr in errs) {
// 将错误信息打印到控制台中
console.log("----");
console.log(errs[attr]['message']);
}
}) - 执行结果见上上图
3.8 集合关联
- 通常不同集合的数据之间是有关系的,例如文章信息和用户信息存储在不同集合中,但文章是某个用户发表的,要查询文章的所有信息包括发表用户,就需要用到集合关联。
- 实现步骤
- 使用ID对集合进行关联
1
2文章中的author属性值
mongoose.Schema.Types.ObjectId - 使用populate(‘关联的属性名’)方法进行关联集合查询
1
2
3Article.find().populate('author')
.then(result => console.log(result))
.catch(err => console.log(err))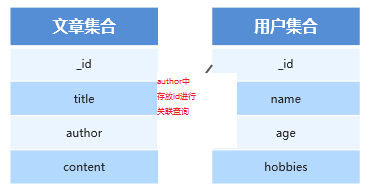
- 使用ID对集合进行关联
- 实现
1
2
3
4
5
6
7
8
9
10
11
12
13
14
15
16
17
18
19
20
21
22
23
24
25
26
27
28
29
30
31
32
33
34
35
36
37
38
39const mongoose = require('mongoose');
mongoose.connect('mongodb://localhost/playground', { useNewUrlParser: true })
// 连接成功
.then(() => console.log('数据库连接成功'))
// 连接失败
.catch(err => console.log(err, '数据库连接失败'));
// 创建用户集合
const User = mongoose.model('User', new mongoose.Schema({
name: {
type: String,
require: true
},
}));
// 创建文章集合
const Article = mongoose.model('Article', new mongoose.Schema({
title: {
type: String
},
author: {
type: mongoose.Schema.Types.ObjectId,
ref: 'User'
}
}));
// 单独创建
// User.create({ name: 'Lily' }).then(result => console.log(result));//{ _id: 5e8b37f9180210181c05db5f, name: 'Lily', __v: 0 }
// Article.create({ name: '123', author: '5e8b37f9180210181c05db5f' }).then(result => console.log(result));
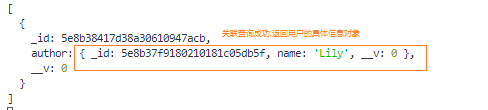
/*
{
_id: 5e8b38417d38a30610947acb,
author: 5e8b37f9180210181c05db5f,
__v: 0
}
*/
// // 关联查询
Article.find().populate('author')
.then(result => console.log(result))
.catch(err => console.log(err)) - 执行结果
案例事件(增删改查)
- 实现思路
- 搭建网站服务器,实现客户端与服务器端的通信
- 连接数据库,创建用户集合,向集合中插入文档
- 当用户访问/list时,将所有用户信息查询出来
- 实现`路由功能
- 呈现用户列表页面
- 从数据库`中查询用户信息 将用户信息展示在列表中
- 将用户信息和表格HTML进行拼接并将拼接结果响应回客户端
- 当用户访问/add时,呈现表单页面,并实现添加用户信息功能
- 当用户访问/modify时,呈现修改页面,并实现修改用户信息功能
- 修改用户信息分为两大步骤
- 1.增加页面路由 呈现页面
- 1.在点击修改按钮的时候 将用户ID传递到当前页面
- 2.从数据库中查询当前用户信息 将用户信息展示到页面中
- 2.实现用户修改功能
- 1.指定表单的提交地址以及请求方式
- 2.接受客户端传递过来的修改信息 找到用户 将用户信息更改为最新的
- 当用户访问/delete时,实现用户删除功能
- 重要知识点
- 通过模板字符串拼接的方式世界html页面
- 通过数据库动态查询页面
- 通重定向的方式跳转页面(重定向写在报文头中)
1
2
3
4
5// 301代表重定向
// location 跳转地址
res.writeHead(301, {
Location: '/list'
}); - 数据库查询API是异步api,通过异步函数(awwait和async)实现异步执行和返回结果注意:异步API中await所在函数必须在async函数中[最近]
- 详细源码见github
总结
- 数据库中的API都是异步API,返回的是promise对象(create(),find()返回数组,findOne()返回一条文档)
- post和get的使用
- post一般实现具体的功能
- get一般接收从浏览器中传过来的
- 模板字符串
- 解析变量:添加变量获取变量值$(变量名来获取)
- 可以换行
- 可以调用函数
本文作者:
SparkParis
本文链接: https://sparkparis.github.io/2020/04/05/Node-%E7%AC%94%E8%AE%B03MongoDB/
版权声明: 本作品采用 知识共享署名-非商业性使用-相同方式共享 4.0 国际许可协议 进行许可。转载请注明出处!
本文链接: https://sparkparis.github.io/2020/04/05/Node-%E7%AC%94%E8%AE%B03MongoDB/
版权声明: 本作品采用 知识共享署名-非商业性使用-相同方式共享 4.0 国际许可协议 进行许可。转载请注明出处!

